In this article, we'll build a very basic job queue using PHP and Redis without using any frameworks. Turns out, it's actually much simpler than you might think.
The purpose of this article is to understand how to build a job queue from scratch to get a fundamental understanding of how job queues work.
There are different types of job queues that exist. Typically, job queues operate on a push model, pull model, event-driven model, pub/sub model, or hybrid model. I might even be forgetting one or two. However, in this article, we'll be explicity writing a job queue that operates on a pull model.
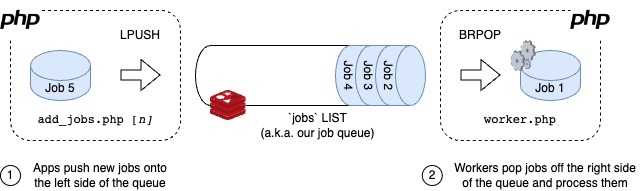
As you see in the diagram, we'll be creating two PHP scripts, one that pushes jobs onto the jobs list (a.k.a. queue) using Redis' LPUSH (left push) command and another script that pulls from jobs using Redis' BRPOP (blocking right pop) command.
Setup
You'll need the following for this article:
- Docker Compose
- Redis Insight (optional, but recommended)
Redis Insight is a free Redis GUI tool I'll be using in this article that I highly recommend because it's free and it's built by Redis.
The entire project is available at this GitHub repo as well: https://github.com/grahamsutton/job-queue-tut
Create a directory for the project at:
$ mkdir job-queue-tut
$ cd job-queue-tut
I've provided the following docker-compose.yml to get you up and running quickly:
version: '3'

services:

  redis:
    image: redis:latest
    ports:
      - 6379:6379

  php:
    build:
      context: ./
      dockerfile: Dockerfile
    tty: true  # Keeps the container from dying after launch
    volumes:
      - .:/app
    depends_on:
      - redis
Normally, I prefer to have only a docker-compose.yml file if I can help it, but in this case we need a separate Dockerfile to install Composer and the Redis PHP extension.
FROM php:8.1-cli

# Install Composer
RUN curl -sS https://getcomposer.org/installer | php -- --install-dir=/usr/local/bin --filename=composer

# Install Redis with PECL and enable the extension
RUN pecl install redis
RUN docker-php-ext-enable redis

WORKDIR /app
After this, we should be able to run the containers:
$ docker-compose upWe're going to create some PHP classes later on in the tutorial, so we'll need some PSR-4 autoloading.
Create a composer.json file add the following contents to get PSR-4 autoloading:
{
    "name": "tutorials/job-queue-tut",
    "autoload": {
        "psr-4": {
            "JobQueueTut\\": "src/"
        }
    }
}
And then run Composer to register the autoloader:
$ composer installLet's Build the Job Queue
Alright, so we have our PHP and Redis containers running, but no job queue yet. So let's get that going.
We're need to create two scripts that handle two very necessary and important tasks for any job queue: inserting jobs into the queue and processing jobs from the queue.
| Script | Description |
|---|---|
add_jobs.php |
A script that will add basic say_hello jobs into the queue with a random person's name as the payload. |
worker.php |
Job worker script. Runs in an infinite loop. Will pull jobs from the Redis queue and process them in the order they were submitted. |
Adding Jobs to the Queue
Let's create the add_jobs.php script. This script will be used to insert a basic job called say_hello into the queue that prints "<random person's name> says hello!" to the terminal when executed by the worker. Normally, this would be your application that queues the job, but we don't have one in this case, so this script will help us simulate that.
Create the add_jobs.php script and paste the following content:
<?php

// Add multiple jobs if argument provided, only 1 if not provided
$totalRecords = $argv[1] ?? 1;

$redis = new \Redis();
$redis->connect('redis', 6379);

$randomPeople = [
    'John', 'Jane', 'Mike', 'Miguel', 'Jacob', 'Karen',
    'Chris', 'David', 'Angela', 'Garrett', 'William'
];

$startTime = microtime(true);

// Insert jobs to Redis queue
for ($i = 0; $i < $totalRecords; $i++) {
    $randomPerson = $randomPeople[array_rand($randomPeople, 1)];

    $redis->lpush('jobs', json_encode([
        'type' => 'say_hello',
        'body' => [
            'name' => $randomPerson
        ]
    ]));
}

$totalTimeMs = (microtime(true) - $startTime) * 1000;

echo "{$totalRecords} job(s) added in {$totalTimeMs} ms.";
echo PHP_EOL;
To run this script, SSH into the php docker container:
$ docker exec -it job-queue-tut-php-1 /bin/bashWhile in the container, we can then add one job to the queue by running:
$ php add_jobs.php
1 job(s) added in 0.67591667175293 ms
And we can also add multiple by passing a positive integer as an argument:
$ php add_jobs.php 5
5 job(s) added in 1.6670227050781 ms.
So we should have 6 jobs created now.
Here's a gif to better illustrate the process:
Now, go to Redis Insight and click the refresh button:
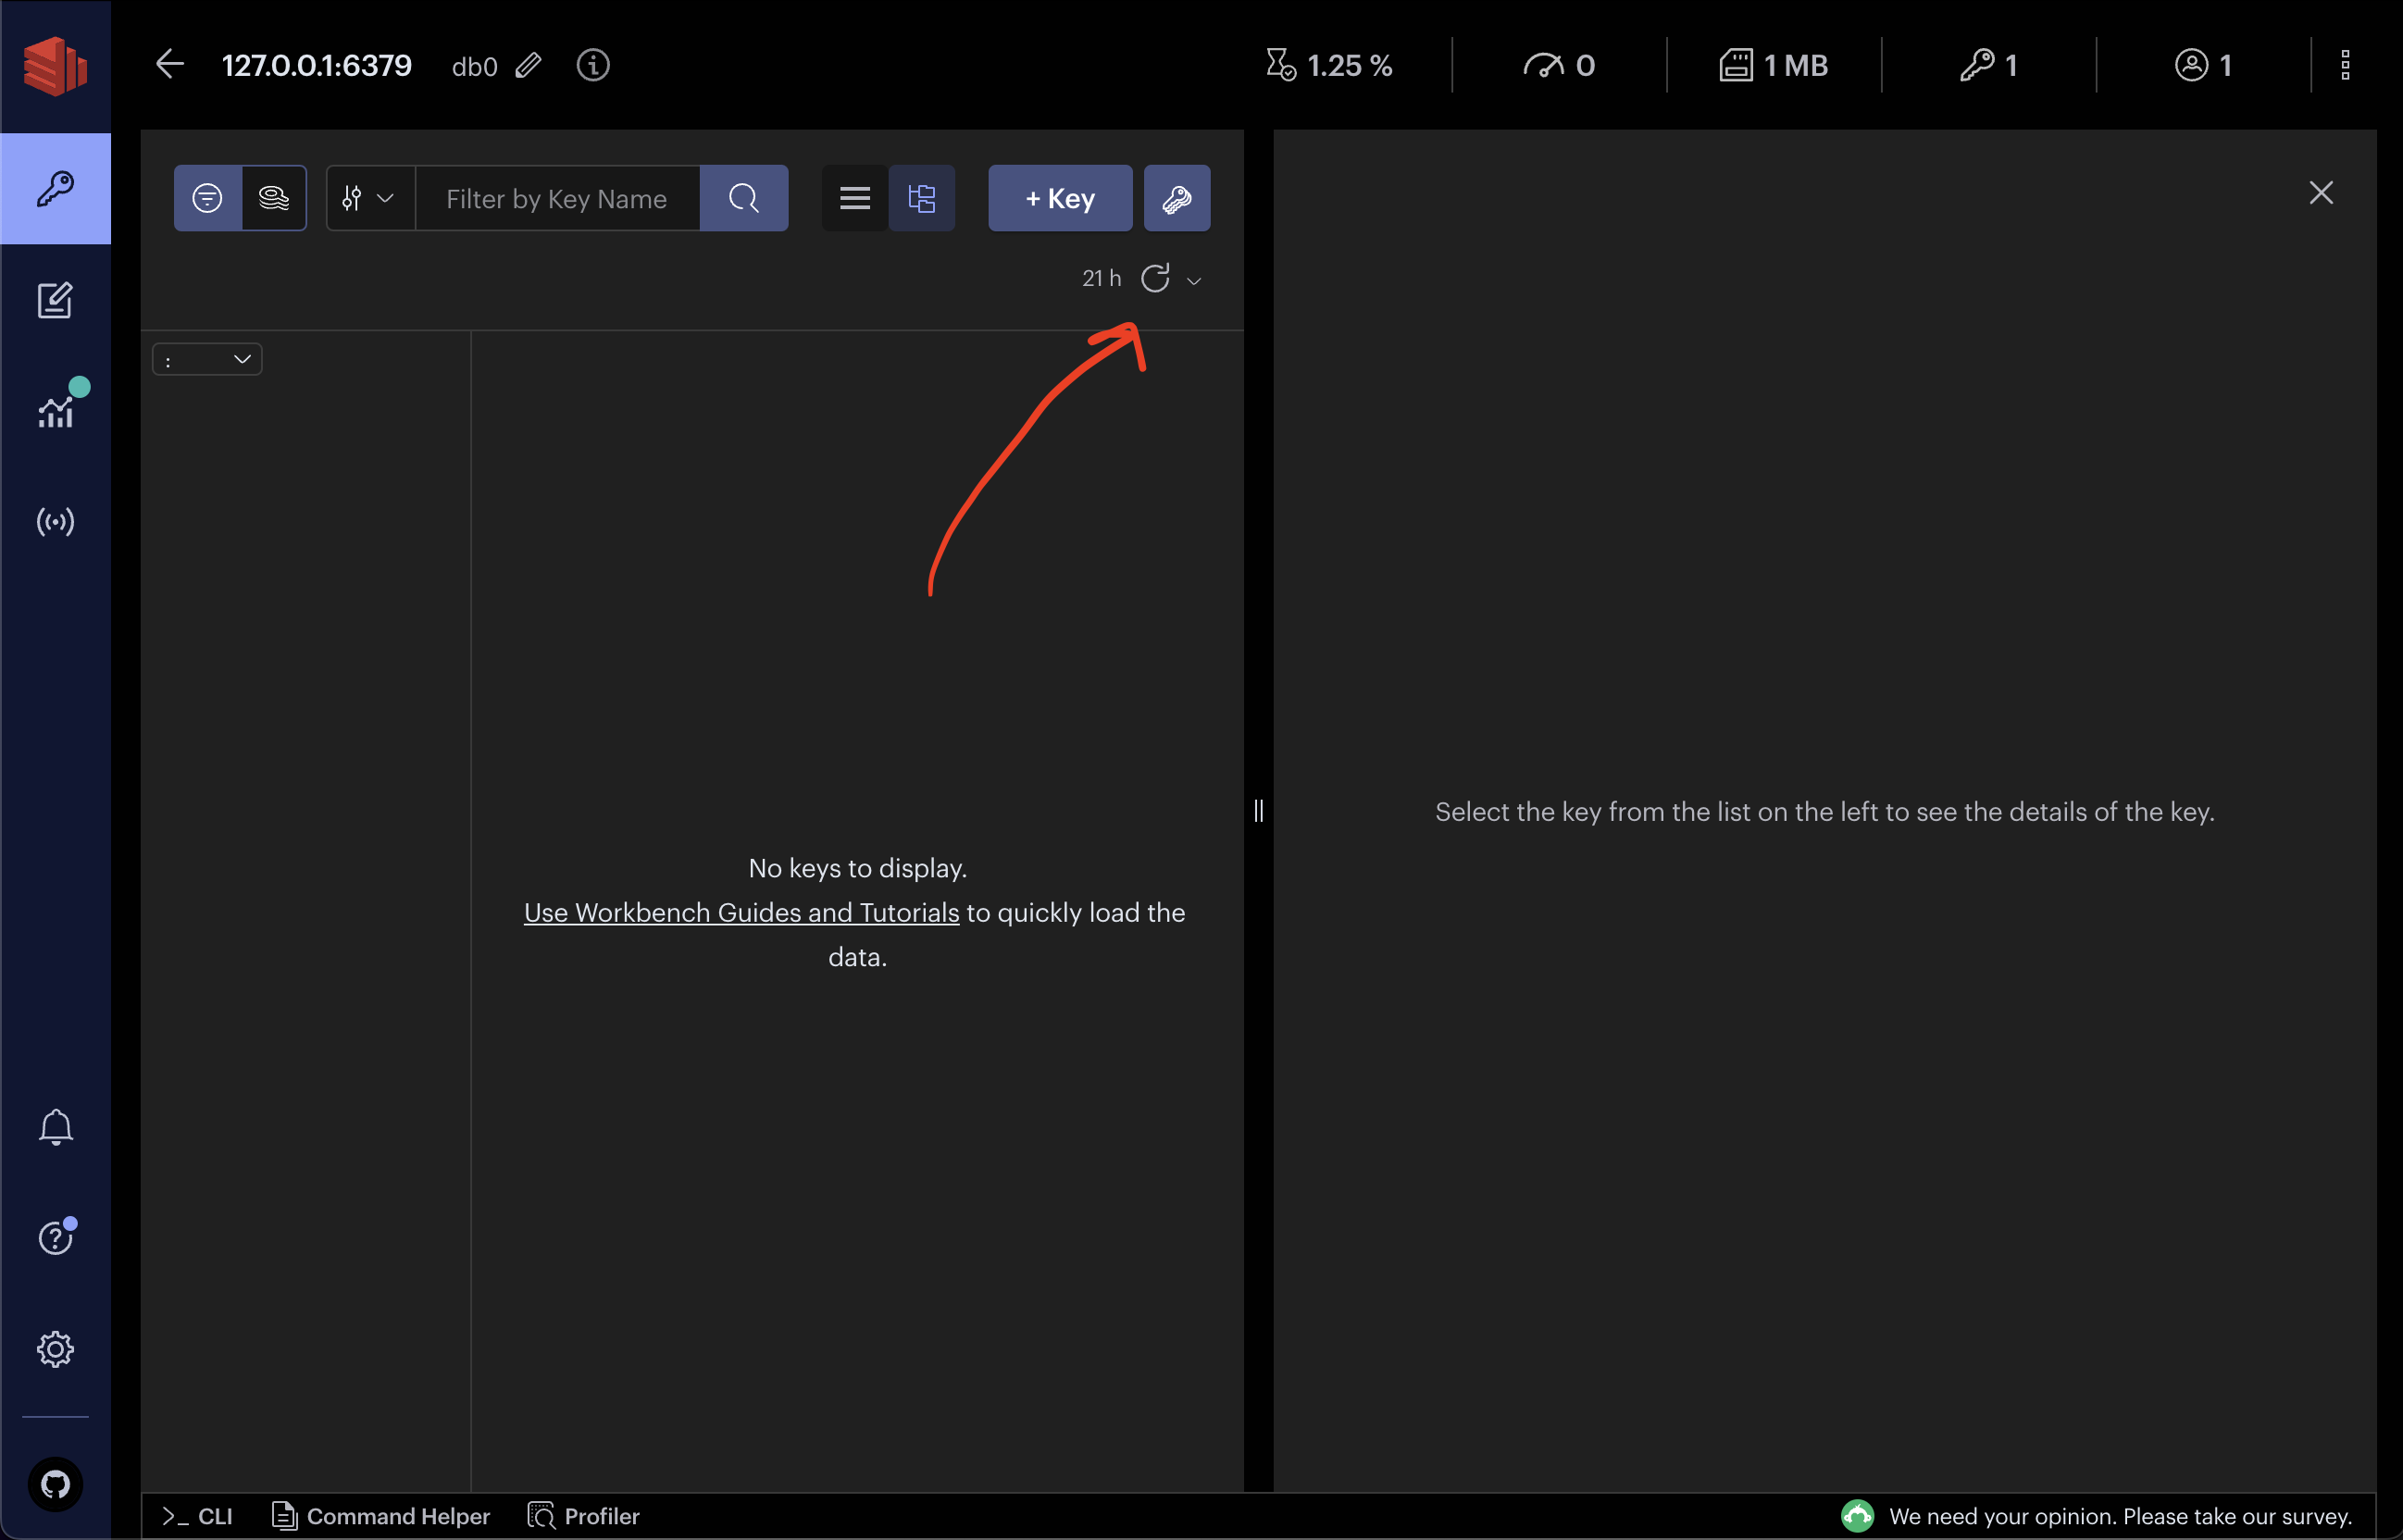
And you should now see a "LIST" key named jobs. If you're not familiar with what a "LIST" key is, it's exactly like a "STRING" key except you can store multiple values on the same key, kind of like an array.
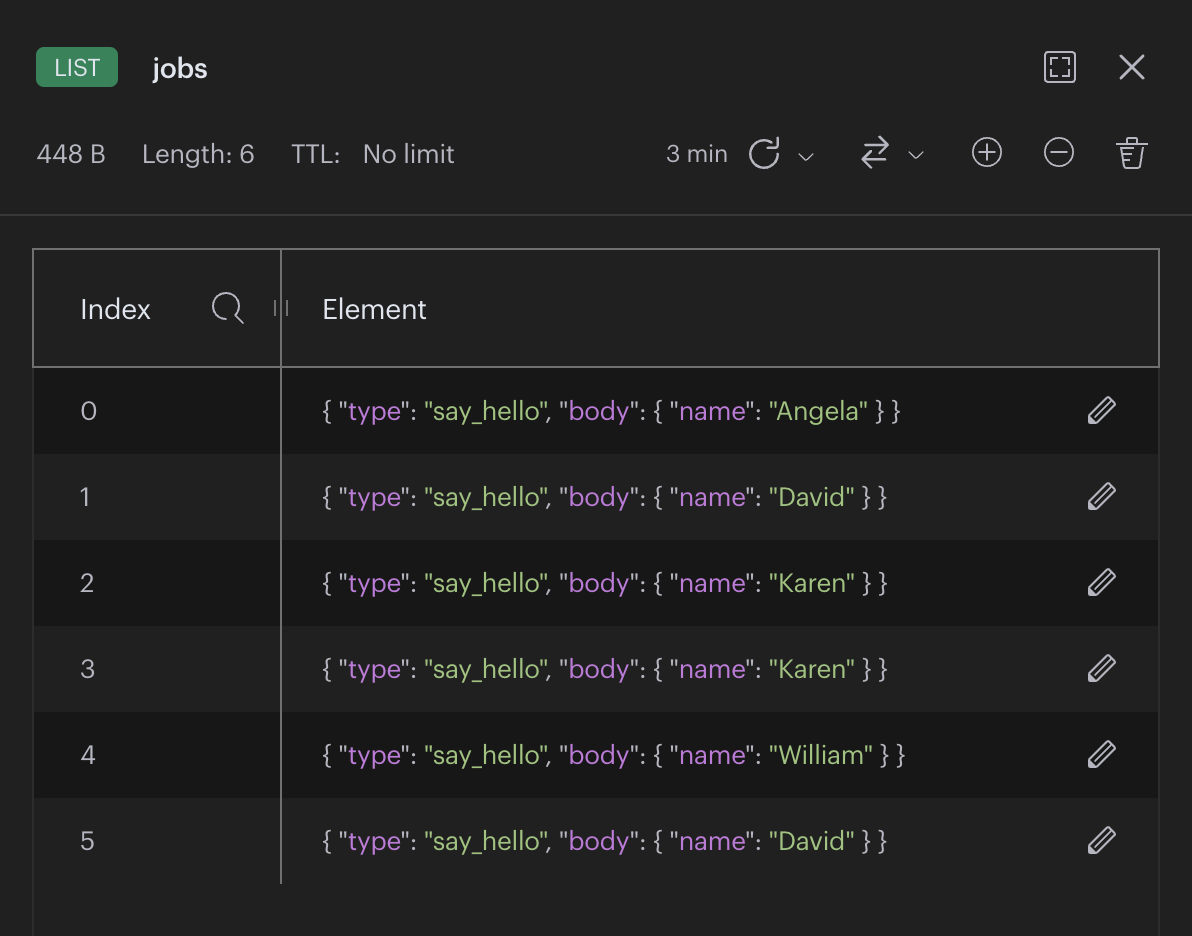
The jobs key was automatically created when $redis->lpush(...) was executed the first time. Each time $redis->lpush(...) was called, another job was added to the queue. So we should see a total of 6 jobs on queue, one for the first time we ran add_jobs.php command and another 5 from the second time we ran the command.
Processing Jobs on the Queue
Now that we've added jobs to the queue, we need to process those jobs. To process those jobs, we need to create a worker.
Let's create a worker.php file and add the following contents:
<?php

require_once __DIR__ . '/vendor/autoload.php';

use JobQueueTut\Jobs\SayHelloJob;

$redis = new Redis();
$redis->connect('redis', 6379);

echo 'Queue worker is listening for jobs...' . PHP_EOL;

while (true) {

    // Loop stops and waits here until a job becomes available
    $jobData = json_decode($redis->brpop('jobs', 0)[1], true);

    $jobBody = $jobData['body'];
    $jobType = $jobData['type'];

    // Here we can add new jobs based on their job `type`
    $job = match ($jobType) {
        'say_hello' => new SayHelloJob(),
        default => throw new \Exception("Job [{$jobType}] does not exist.")
    };

    $job->execute($jobBody);
}
Let's also create the Corresponding SayHelloJob class:
$ mkdir src && cd src
$ mkdir Jobs && cd Jobs
In the src/Jobs directory, create a SayHelloJob.php file and paste the following content:
<?php

namespace JobQueueTut\Jobs;

use JobQueueTut\Job;

class SayHelloJob implements Job
{
    public function execute(array $payload): void
    {
        $name = $payload['name'];

        echo "{$name} says hello!" . PHP_EOL;
    }
}
Our SayHelloJob class implements a Job interface that we also haven't defined yet, so let's define it.
First, let's hop back a directory:
$ cd ..And now, create a file called Job.php and paste the following content:
<?php

namespace JobQueueTut;

interface Job
{
    public function execute(array $payload): void;
}
The reason for the interface is so that we can easily add new jobs over time and guarantee that those new jobs have the expected execute method name and $payload parameter. It's good practice. Even better practice would be to convert the $payload parameter to be an object instead of an array, but I want to keep the focus of this article on building a simple job system. Anyway, I digress.
Let's go ahead and start the worker. Make sure to open a shell into the PHP container if you aren't in one:
$ docker exec -it job-queue-tut-php-1 /bin/bashAnd then start the worker:
$ php worker.phpYou should immediately see the six jobs that were in the queue get processed in the order they were submitted.
Here's a gif of the process:

The worker will run in an infinite loop, waiting for jobs to pull from the queue. This is made possible by Redis' BRPOP function, which is short for "blocking right pop".
This job queue is simple enough that you could also use RPOP instead of BRPOP and get the same result. The only difference between the two is that BRPOP allows you to pop from multiple lists and RPOP only pops from one. They both are blocking operations that force the execution of your PHP client script to wait until another job is available or until a timeout is reached.
To show this running in a real time, keep the worker running in your terminal and open another terminal window, tunnel into the same php container, and then add jobs. As you keep adding them, the job queue will keep processing them as they come in.
And what happens if we have two workers running at the same time?
We can see that the first worker processed one job while the other worker processed the other four jobs we created. When you have multiple workers running, Redis ensures that each job is only processed by one worker. This let's you safely scale up the number of workers you need to process large queues.
Conclusion
In this article, we configured a very basic job queue using just PHP and Redis. However, there's a lot more to job queues than just the "happy path" we built. We also need to consider what happens when there are failures.
One very important thing to note is that RPOP/BRPOP remove elements from the queue. This means you will lose the job completely if it fails during execution. If you wanted to stick to keeping everything in Redis, you could create your own retry process. That might look something like creating another list in Redis that contains the failed jobs and another PHP script that runs periodically on a cronjob that pulls n number of failed jobs and reinserts them back into the jobs list for processing. You'd also want to introduce some retry limits so you're not retrying bad jobs forever. But even though you could use Redis, you'll have a more durable system by keeping those failed jobs in a database like MySQL, PostgreSQL, or MongoDB, as Redis is not typically geared for long-term storage. You would then take those failed jobs from the database and reinsert them into the queue when it's time to process.
One last point, too, is that there is no traceability in this job queue. That means after a job is processed, you have no way of going back and checking if the job passed. This might be fine, depending on your needs. Maybe you don't need to trace down jobs. But if there's ever some kind of issue in production, it's nice to know you can always go back and analyze what the payload was.
This is why I still recommend that even though we can build a simple job queue with just PHP and Redis, you still need to consider other aspects in your final solution to truly have a robust job system.
If you enjoyed this article and would like me to follow this up with a Part 2 about error handling, let me know in the comments section below. Thanks for reading!